
Continuing with the Monthly Module set up from the previous post, which focused mainly on the left page of the monthly spread, let's tackle the habit tracker on the right page.


In this technique, the right page borrows the dates and weekdays already marked on the left page. The weekly subdivisions help in visually keeping track of your weeks and make it easier to maintain the tracker. The tracker works best with this technique if the tracker requires no more than half of the width of the page.
If you allowed some margin space on the bottom of the dates column on the left page, you'll have space at the top and bottom of the habit tracker to label the columns. Just above and just below the tracker, a single letter or icon of any kind can suffice for each habit you want to track. Labeling above and below is repeated writing, but it may help speed up the use of the tracker making it easier to manage through out the month.
If necessary, you can spell out (vertically) the full label over each symbol above the top row of icons.

 Next, you can color in a couple of the small squares for glass seven. And color in the last two for glass 8. A fully filled square indicates 8 glasses have been consumed. Congratulations!
This quadrant counter can be used for any number of things. After the sixth mark, with four empty squares, this system could be used as a 10 counter rather than an 8 counter, if you need to count up to 10 items per day for what ever reason.
Using primarily dots, this system is quick and easy to maintain and easy to read after the fact. It's all about speed and ease of use. (see part 1 and part 3)
Got any other streamlined habit tracker ideas? Comment here.
Style Basics
A quick recap of the principles of the Ultra-Streamlined Style:- avoid using unnecessary tools (extra tools require extra time to use)
- avoid drawing lines when space can be used instead
- write no more than necessary (purely functional use)
Setting up the tracker
In keeping with the recommended monthly module as described at BulletJournal.com, which includes a tasks list, this Ultra-Streamlined Style makes room for a habit tracker on the task list page (the right page of the monthly spread).
In this technique, the right page borrows the dates and weekdays already marked on the left page. The weekly subdivisions help in visually keeping track of your weeks and make it easier to maintain the tracker. The tracker works best with this technique if the tracker requires no more than half of the width of the page.
If you allowed some margin space on the bottom of the dates column on the left page, you'll have space at the top and bottom of the habit tracker to label the columns. Just above and just below the tracker, a single letter or icon of any kind can suffice for each habit you want to track. Labeling above and below is repeated writing, but it may help speed up the use of the tracker making it easier to manage through out the month.
If necessary, you can spell out (vertically) the full label over each symbol above the top row of icons.
Using the tracker
Let's take a closer look at the tracker itself. If you'll notice, the set up is written in one color, while the actual use of the tracker is a different color. This visually helps to distinguish your tracked data from the frame you already created. Using a multi-color pen can accomplish this without having to carry multiple writing implements.
Hydration (quadrant counter)
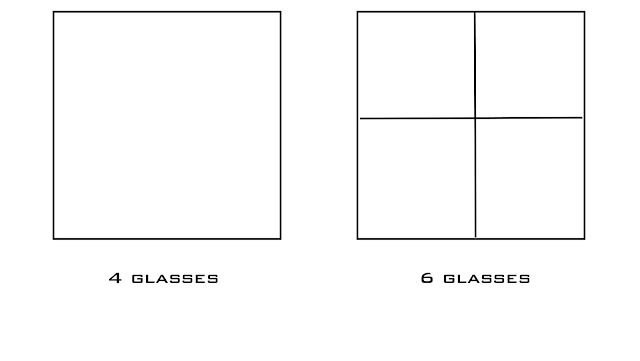
Many of us have a problem getting enough water each day. In the left column of this tracker is a streamlined counter system I created - a quadrant counter. This icon is made through out the day, using a line to represent each 8oz glass of water consumed. After four glasses, you will have drawn a square. For the next two glasses, draw either a vertical or horizontal line inside the square; this results in a plus sign inside the outer square. You should have four small empty squares at this point.
This quadrant counter can be used for any number of things. After the sixth mark, with four empty squares, this system could be used as a 10 counter rather than an 8 counter, if you need to count up to 10 items per day for what ever reason.
Double counter
If you have a category of something you need to do each day, which needs to be done twice, you can use a percentage style or X style double counter. In this counter, start by simply marking a diagonal line in that category. During the day, as you accomplish one instance of this task, mark a dot above or below. In my case, I'm working on two foreign languages, so it matters to me whether the dot is on the top or the bottom. As you can see in the photo, I did well at keeping up with one language but not both.Using primarily dots, this system is quick and easy to maintain and easy to read after the fact. It's all about speed and ease of use. (see part 1 and part 3)
Got any other streamlined habit tracker ideas? Comment here.
Comments
Post a Comment